

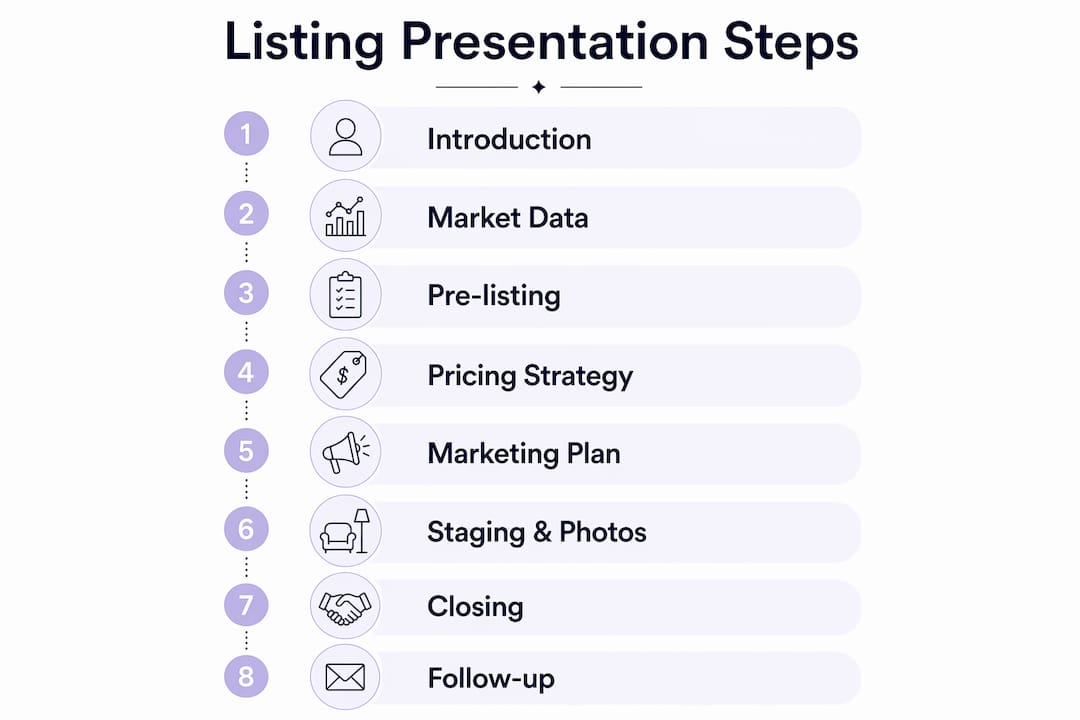
Overview: A winning listing presentation process combines a confident self-introduction, current market data, a compelling CMA, a detailed marketing plan, and a clear close. Agents who structure these elements deliberately and tailor them to each seller consistently outperform those who wing it. Here is exactly how to build and deliver a presentation that earns signatures.
The core components of an effective listing presentation process are:
- Self-introduction and agenda: Establish credibility, share your track record, and outline what the meeting will cover
- Local market data: Present current inventory levels, median prices, and market conditions with visual clarity
- Home selling process overview: Walk sellers through every stage from listing to closing so they know what to expect
- Pre-listing preparation: Demonstrate the work you do before the sign goes in the yard, from documentation to property readiness
- Pricing strategy and CMA: Anchor your recommended price in comparable sales data and market context
- Marketing plan: Detail every channel you will use, digital and traditional, to generate buyer demand
- Visual presentation elements: Show how professional photography, staging, and virtual tools will position the home
- Objection handling and close: Address concerns confidently and ask for the business with a clear next step
- Follow-up plan: Outline how you will stay in contact and move toward a signed agreement
Each element builds on the last. Skip one and sellers notice the gap. Nail all of them and you walk out with a listing.
Table of Contents
- 1. How to open your listing presentation with a strong self-introduction
- 2. How to present local market data and explain the selling process
- 3. Pre-listing preparation and how to qualify your sellers
- 4. How to build a pricing strategy with a CMA that sellers trust
- 5. What your marketing plan needs to cover to win the listing
- 6. How staging and photography shape buyer perception
- 7. How to handle seller objections and close the listing agreement
- 8. Advanced listing strategies that give you an edge in 2026
- 9. How to structure your presentation flow for maximum impact
- 10. Which technology tools make your presentation more persuasive
- 11. Post-presentation follow-up that keeps you top of mind
- Take your listing presentation process further with Plo
- Key Takeaways
1. How to open your listing presentation with a strong self-introduction
The first three minutes of your listing appointment set the tone for everything that follows. Opening with a clear agenda and a confident self-introduction builds rapport and signals that you run a professional process, not a casual conversation.
Your introduction should cover four things quickly:
- Your name and brokerage: State it plainly. No need to recite your entire career history.
- Your local track record: How many homes have you sold in this neighborhood or zip code? What is your average days on market? Sellers want proof you know their street, not just the industry.
- Your unique value proposition: One or two sentences on what sets you apart. “I run a seven-channel marketing launch that creates buyer competition before the home ever hits the MLS” is more memorable than “I work hard for my clients.”
- The meeting agenda: Tell sellers exactly what you will cover and how long it will take. “We have about 45 minutes. I want to spend the first ten on pricing, then walk through my marketing plan, and leave plenty of time for your questions.” That structure immediately reduces seller anxiety.
After your introduction, ask one open question before you say another word about yourself: “Before I get into the presentation, what matters most to you about how your home is marketed?” The answer tells you where to focus your pitch and signals that this is a conversation, not a monologue.
Pro Tip: Prepare a one-page agent bio with a headshot, your recent local sales, and a brief brokerage overview. Send it as part of your digital pre-listing packet 24–48 hours before the meeting so sellers arrive already familiar with your background.
2. How to present local market data and explain the selling process

Sellers make better decisions when they understand the market they are selling into. Your job is to translate raw data into context they can act on.
Present the local market snapshot first, before you get into pricing. When sellers see current inventory levels and median days on market, your pricing recommendation makes sense instead of feeling arbitrary.
| Market Indicator | What to Show | Why It Matters |
|---|---|---|
| Median sale price | Current period, your zip code | Anchors seller expectations to real data |
| Average days on market | Current period, comparable homes | Sets realistic timeline expectations |
| List-to-sale price ratio | Current period | Shows whether homes are selling above or below asking |
| Active inventory | Current listings in the price range | Reveals buyer competition level |
| Absorption rate | Months of supply | Indicates buyer vs. seller market conditions |
Pull this data from your local MLS the morning of your appointment. Stale numbers undermine trust faster than almost anything else.
Once you have walked through the market snapshot, explain the selling process in plain terms. Many sellers have not sold a home in years and do not know what happens between signing the listing agreement and closing day.
- Week 1: Pre-listing preparation, photography, and staging
- Week 2: MLS launch and marketing activation across all channels
- Weeks 2–4: Showings, open houses, and buyer feedback collection
- Offer stage: Review, negotiation, and acceptance
- Under contract: Inspection, appraisal, and title work
- Closing: Final walkthrough and settlement
Walking sellers through this sequence does two things. It positions you as the expert guiding them through a complex process, and it naturally leads into your pricing and marketing discussion.
3. Pre-listing preparation and how to qualify your sellers
The work you do before the appointment is what separates a confident presentation from a generic one. Pre-listing preparation includes property inspection findings, documentation review, and a clear read on the seller’s motivation and timeline.
Typical pre-listing tasks to highlight in your presentation:
- Review property disclosures and title history
- Walk the property and note repair or staging priorities
- Pull HOA documents if applicable
- Research permit history for any additions or renovations
- Prepare a seller net proceeds estimate at your recommended price point
- Compile neighborhood comps and recent sales data
Showing sellers this checklist communicates that you have already been working on their behalf before they signed anything. That is a powerful trust signal.
Qualifying the seller is equally important. Not every seller is ready to list, and discovering a misalignment after you have invested hours in a presentation costs you time and credibility. Ask these questions before or during the appointment:
- What is your target move-out date?
- Have you already purchased or are you contingent on this sale?
- What price range are you expecting, and how did you arrive at that number?
- Are all decision-makers present today, or will others be involved in the final decision?
- Have you spoken with other agents?
The answers shape how you frame your pricing recommendation and how urgently you push toward a close.
Pro Tip: Send a digital pre-listing packet 24–48 hours before the meeting. Use a platform that tracks when the seller opens it and which sections they spend the most time on. If they linger on the marketing plan page, lead with marketing. If they go straight to pricing, address that first. The data tells you exactly where their head is before you walk through the door.
4. How to build a pricing strategy with a CMA that sellers trust
Pricing is the moment most sellers are waiting for. Lead with it, not at the end. If sellers spend your entire presentation wondering what you think their home is worth, they absorb almost nothing else you say.
A Comparative Market Analysis (CMA) is the analytical backbone of your pricing recommendation. Include 3–6 recently sold properties that are genuinely comparable in size, condition, location, and age. The goal is not to find the highest possible comp. It is to find the most accurate ones.
| Address | Sq Ft | Beds/Baths | Sale Price | Price/Sq Ft | Days on Market | Sale-to-List Ratio |
|---|---|---|---|---|---|---|
| — | — | 3/2 | $485,000 | — | — | — |
| 87 Oak Ave | — | 3/2 | — | — | — | — |
| — | — | 4/2 | — | — | 9 | — |
| — | — | 3/2 | — | — | — | 100% |

Walk sellers through each comp and explain why you included or excluded it. That transparency builds confidence in your final recommendation.
Beyond the comparables, your pricing strategy should account for:
- Current market conditions: Is inventory rising or falling? Are buyers competing or waiting?
- Property condition: Deferred maintenance or dated finishes typically require a price adjustment
- Timing: A spring listing in a low-inventory market commands a different strategy than a fall listing with rising supply
- Seller goals: A seller who needs to close in 30 days prices differently than one who can wait for the right buyer
Present a price range, not a single number. “Based on the comps and current market conditions, I recommend listing between $485,000 and $495,000” gives sellers agency while keeping expectations grounded. Then explain which end of the range makes sense given their timeline and condition.
5. What your marketing plan needs to cover to win the listing
Your marketing plan is where you differentiate yourself from every other agent who walked through that door. A vague promise to “put it on Zillow and do some social media” loses listings. A tiered, channel-specific plan wins them.
Listings with video marketing generate 403% more inquiries than those without. That single statistic, presented to a seller, reframes the entire conversation about marketing investment.
Structure your marketing plan by tier based on the property’s price point:
For listings under $500K:
- Professional photography (non-negotiable at every price point)
- MLS listing with complete data and optimized description
- “Coming Soon” social media post on Instagram and Facebook before going live
- Clean print flyers for open houses and local distribution
- Email announcement to your sphere of influence and agent network
For listings $500K–$2M:
- Everything above, plus a cinematic walkthrough video (1–2 minutes, professionally shot)
- 3D Matterport tour for out-of-town buyers
- Targeted paid ad campaign on Facebook and Instagram with demographic and income targeting
- Dedicated email blast to your full database
- Multi-page print brochure for open houses and broker previews
For listings $2M+:
- Everything above, plus a custom property website with a dedicated URL (e.g., 123OceanDrive.com)
- Digital PR outreach to local and national design and architecture publications
- Invitation-only broker’s open for top agents in your market
- High-end direct mail to a curated list of high-net-worth individuals in the area
- Story-driven social content that builds an aura around the property, not just photos
Presenting this framework to sellers does more than explain your plan. It positions you as a marketing strategist who thinks in systems, not tasks. That is the agent sellers want representing their most valuable asset.
6. How staging and photography shape buyer perception
87% of buyers say photos are the most influential factor in their online property search. Your visual presentation strategy is not a nice add-on. It is the first thing buyers judge.
Professional photography is the floor, not the ceiling. Every listing at every price point deserves a professional photographer. Phone photos, even good ones, signal low effort to buyers scrolling through hundreds of listings.
Beyond photography, staging decisions directly affect how quickly a home sells and at what price. The choice between physical and virtual staging is worth addressing explicitly in your presentation.
| Staging Method | Typical Cost | Best For | Visual Impact |
|---|---|---|---|
| Physical staging (full) | $2,000–$5,000+ | Occupied homes needing furniture refresh | High, especially for in-person showings |
| Physical staging (partial) | $500–$1,500 | Homes with good bones but dated decor | Moderate to high |
| Virtual staging | Significantly less | Vacant homes, investment properties | Comparable to physical for online listings |
| DIY staging | Minimal | Well-furnished, move-in-ready homes | Variable |
Virtual staging costs 91% less than traditional physical staging while delivering comparable or better visual results for online listings. For vacant properties especially, virtual staging transforms empty rooms into aspirational spaces without the logistics of moving furniture.
Video tours and 3D walkthroughs extend the visual experience beyond static photos. A Matterport 3D tour lets buyers walk through the home at 2 AM from across the country, which is particularly valuable for relocation buyers and out-of-state investors.
Pro Tip: For vacant listings, lead with virtual staging in your presentation. Show sellers a before-and-after example from a previous listing. The cost savings are compelling, and the visual quality speaks for itself. It also demonstrates that you are thinking about their bottom line, not just your marketing budget.
7. How to handle seller objections and close the listing agreement
The close is where most agents lose momentum. They deliver a strong presentation, then soften at the moment that matters most. Confidence at the close is not aggressive. It is professional.
The most common seller objections and how to address them:
- “Your commission is too high.” Respond by walking back through your marketing plan tier by tier. “The commission covers professional photography, a cinematic video, a targeted ad campaign, and my full-time coordination through closing. Let me show you what that looks like compared to a flat-fee approach.” Then ask: “What specifically feels out of proportion to you?”
- “We want to try a higher price first.” Acknowledge the instinct, then show the data. “I understand the impulse, and I want to get you every dollar the market will support. The comps show that homes priced above $510,000 in this neighborhood are sitting for 45+ days and eventually selling below asking. Pricing right from day one typically nets sellers more.”
- “We’re talking to two other agents.” This is not an objection. It is an invitation to differentiate. “That makes sense. When you compare presentations, ask each agent to show you exactly how many channels they activate in the first seven days and what their average sale-to-list ratio is in this zip code.”
- “We need to think about it.” Ask what specifically needs more consideration. Often there is one unresolved question underneath the hesitation. Surface it and address it directly.
When you are ready to close, do not ask “So, what do you think?” That invites ambiguity. Instead, be direct: “I would love to get started. Here is the listing agreement. If we sign today, I can have the photographer scheduled by Thursday and the listing live by next Tuesday. Does that timeline work for you?”
Rapport throughout the presentation makes the close feel natural. Sellers who feel heard and understood rarely need to be pushed. They are ready.
8. Advanced listing strategies that give you an edge in 2026
The most effective listing presentations in 2026 go beyond the standard CMA-plus-marketing-plan format. Sequencing market exposure and building buyer momentum before the MLS launch is the approach separating top agents from the rest.
The core idea is straightforward: buyer interest peaks before a home is publicly listed, not after. A structured multi-channel launch that concentrates marketing activity in the days before and immediately around the MLS go-live can generate visible buyer competition and improve final sale prices.
Here is how to present this strategy to sellers:
- Pre-market “Coming Soon” exposure: List the property as “Coming Soon” on platforms that support pre-market visibility. This builds a pool of interested buyers before day one on the MLS.
- Database activation: Send a direct preview to your registered buyer database and agent network before the public launch. Buyers who see the home first, before competing buyers, are more motivated to act quickly.
- Custom property landing page: Build a dedicated property website before the MLS launch. Buyers can save it, share it, and pre-schedule tours for the moment the listing goes live.
- Simultaneous multi-channel push on launch day: Activate all channels at once: MLS, social media ads, email blast, direct mail, and open house announcement. The simultaneous launch creates a sense of event around the listing.
- Grand Opening strategy: Structure the first showing opportunity as a concentrated event where multiple buyers arrive in the same window. Buyers who see others competing are more likely to submit strong offers.
Statistic to share with sellers: Listings with video marketing generate 403% more inquiries than those without. When you pair that with a sequenced pre-market launch, you are not just getting more eyes on the listing. You are getting the right eyes at the right moment.
Tracking seller engagement with your digital pre-listing packet gives you another edge. When you can see which sections a seller revisited before the meeting, you arrive knowing exactly what to address first. That level of preparation reads as expertise, because it is.
9. How to structure your presentation flow for maximum impact
Structure is what turns a collection of good content into a presentation that closes. The sequence matters as much as the substance.
The most effective flow for a listing appointment runs like this:
- Rapport and agenda (5 minutes): Open with your introduction, ask about their goals, and outline the meeting structure.
- Market overview (5 minutes): Present local data before anything else. Context first, then recommendation.
- Pricing and CMA (10 minutes): Lead with pricing, not at the end. Sellers who know your recommended price absorb everything else more clearly.
- Marketing plan (10 minutes): Walk through your full channel strategy, tiered to the property’s price point.
- Visual strategy (5 minutes): Show photography and staging examples from previous listings. Before-and-after visuals are particularly persuasive.
- Process roadmap (3 minutes): Walk through the timeline from signing to closing.
- Objections and questions (10 minutes): Invite questions and address them directly. Do not rush this section.
- Close (2 minutes): Ask for the business with a specific next step and a timeline.
Keep the core presentation under 25 minutes. Plan for the full meeting to run 45–60 minutes when you include conversation, questions, and the commission discussion. Sellers lose focus after 25 minutes of one-directional content.
Personalization is what makes a structured presentation feel human rather than templated. Use the property address on your cover slide. Reference the specific neighborhood. Include a photo of the home from your walkthrough, even a phone photo. Generic presentations feel generic, and sellers notice.
The best listing presentations are conversations rather than monologues. Ask questions throughout. “Does this pricing range align with what you were expecting?” and “Which of these marketing channels feels most important to you?” keep sellers engaged and give you real-time feedback on where to spend more time.
10. Which technology tools make your presentation more persuasive
The right tools do not just make your presentation look polished. They give you data, speed, and a level of personalization that manual processes cannot match.
Presentation software: PowerPoint and Google Slides remain workhorses, but platforms like Canva allow you to build visually branded presentations quickly without a design background. For luxury listings, a custom-designed PDF or interactive digital presentation signals the level of marketing sophistication sellers expect at that price point.
CMA tools: Your MLS is the primary source, but dedicated CMA platforms allow you to generate branded, visual reports that are far more compelling than a raw MLS printout. A well-designed CMA with charts, neighborhood maps, and clear comparable breakdowns communicates professionalism before you say a word.
Digital pre-listing packets: Sending your pre-listing materials as a trackable digital link rather than a static PDF gives you engagement data. You know when the seller opened it, which pages they spent time on, and whether they shared it with a spouse or partner. That intelligence shapes your entire presentation strategy.
3D tour and video tools: Matterport is the industry standard for 3D walkthroughs. For video, a professionally edited cinematic walkthrough is now expected at the $500K+ price point. Present these capabilities with examples from previous listings, not just descriptions.
CRM and pipeline tools: Your real estate prospecting tools should connect your listing presentation workflow to your broader client pipeline. When a seller goes from prospect to signed client, the transition should be frictionless, with all notes, documents, and follow-up tasks already organized.
Plo is built specifically for this kind of end-to-end workflow. From prospecting and pre-listing packet delivery to post-presentation follow-up, Plo amplifies the work you are already doing without adding complexity. The tools agents use every day should work together, and that is exactly what Plo delivers.
11. Post-presentation follow-up that keeps you top of mind
The presentation ends when you leave the room. The follow-up is where listings are won or lost.
Same-day summary: Send a written recap within 2–3 hours of the meeting. Reference specific things you discussed, the seller’s stated timeline, their pricing expectations, and any concerns they raised. This proves you listened, and it keeps your presentation fresh in their mind when they are comparing notes with other agents.
Digital presentation link: Send a trackable link to your full presentation so sellers can review it at their own pace and share it with family members who were not at the meeting. When you see the seller re-open your materials or share them with someone new, that is your signal to reach out. A call that arrives right after someone revisits your presentation feels timely, not pushy.
Follow-up cadence:
- Day 1: Written summary email with your recommended price range and marketing timeline
- Day 2–3: Phone call to answer any questions that came up after the meeting
- Day 5–7: Check-in if no decision has been made, with a specific reason to reach out (a new comp that just closed, a market update, a showing request from a buyer in your database)
- Week 2+: Monthly market update email if the seller is still deciding
The follow-up sequence should feel like service, not pressure. Every touchpoint should add something: a new data point, an answer to an open question, or a concrete next step. Sellers who feel informed and supported make decisions faster.
Organizing your follow-up workflow inside a real estate CRM keeps every touchpoint on schedule and every detail in one place. When a listing moves from presentation to signed agreement to active marketing, the number of files and tasks grows fast. A structured system means nothing falls through the cracks.
Take your listing presentation process further with Plo
The agents winning the most listings in 2026 are not just better presenters. They run better systems. Plo gives real estate agents the tools and expert support to win more clients locally, sharpen their sales pitch, and deliver presentations that close. From pre-listing packet delivery to post-presentation follow-up, Plo amplifies every step of your process.
Ready to control the narrative and become the power broker in your market? Book a demo and see what Plo can do for your listing pipeline.
Key Takeaways
A winning listing presentation process combines market data, a tiered marketing plan, and a confident close, all structured to answer the seller’s two biggest questions: what is my home worth, and how will you sell it?
| Point | Details |
|---|---|
| Lead with pricing | Present your CMA and recommended price range in the first ten minutes, not at the end. |
| Video drives inquiries | Listings with video marketing generate 403% more inquiries than those without. |
| Virtual staging saves money | Virtual staging costs 91% less than physical staging with comparable visual impact for online listings. |
| Sequence your launch | A pre-market “Coming Soon” strategy builds buyer momentum before the MLS go-live date. |
| Follow up the same day | Send a written recap within 2–3 hours referencing specific points from the seller’s conversation. |